This is default featured post 1 title

Go to Blogger edit html and find these sentences.Now replace these sentences with your own descriptions.This theme is Bloggerized by Lasantha Bandara - Premiumbloggertemplates.com.

This is default featured post 2 title

Go to Blogger edit html and find these sentences.Now replace these sentences with your own descriptions.This theme is Bloggerized by Lasantha Bandara - Premiumbloggertemplates.com.

This is default featured post 3 title

Go to Blogger edit html and find these sentences.Now replace these sentences with your own descriptions.This theme is Bloggerized by Lasantha Bandara - Premiumbloggertemplates.com.

This is default featured post 4 title

Go to Blogger edit html and find these sentences.Now replace these sentences with your own descriptions.This theme is Bloggerized by Lasantha Bandara - Premiumbloggertemplates.com.

This is default featured post 5 title

Go to Blogger edit html and find these sentences.Now replace these sentences with your own descriptions.This theme is Bloggerized by Lasantha Bandara - Premiumbloggertemplates.com.

To Redirect Blogger Feed To FeedBurner Feeds

redirect blogger feed to feedburner feed

Redirect Blogger feed to Feedburner feed is a good idea to track all your reader activity and using your Blogger feed in Feedburner feed have many advantages. So before redirect your Blogger feed to Feedburner feed you have to setup your your Feedburner feed for your Blogger feed and after setup your feed in Feedburner feed then you can redirect your existing Blogger feed to Feedburner feed so let's first set up your Feedburner feed. we have already created a post about setup your Feedburner feed so firstly go to,
Sign in to your blogger dashboard :


redirect blogger feed to feedburner feeds


-- > Click on Setting ::


how to redirect feedburner feed to blogger feed


--> Click on Site Feed ::

how to redirect feedburner feed to blogger feeds

Now select your option in 'Allow Blog Feeds' as your needs and in the 'Post Feed Redirect URL' write your Feedburner Feed URL as you did setup before. Now click on SAVE SETTINGS.

***Your default existing feed url was like,
http://yourblogname.blogspot.com/feeds/posts/default
change the colored area with your blog url
Now copy the whole code and paste in new tab then you will see it will redirect to your FeedBurner feed.

You done!

How To Add HTML Signature/Image Signature To Gmail Account Messages

Sign into your Gmail Account and then go to options and click on Mail Settings as the following preview,

add html signature to gmail account

When you clicked on Mail Settings then in the General tab ( Don't click to anything because after click your mail setting you will reach the default tab that is General tab) just scroll the page and find Signature: option, by default it is selected as No signature so uncheck it and tick the below and write your own signature.as the below preview,

how to add html image signature to gmail signature

To make any clickable link just write your text and select it and click on clickable link icon as shown in figure and for uploading the images just click on icon as shown in figure and put your direct link of your image. (You can not upload your images direct from your computer hard drive so first upload it to any hosting site and then note your direct link. You can host your images to your blogger so that you will get your direct link so how to get it click on How To Host Images for Free in Blogger.) If you want to clickable images then click on your image which you uploaded and then click on clickable link icon as shown in preview and that's it. After adding your signature don't forget to click on Save Changes.
Now click on Compose mail you will see your signature.
You done

Black Hat SEO Techniques To Avoid

Black Hat SEO Techniques To Avoid

Black Hat SEO is a technique to getting the top positions or higher ranking in major search engines like Google, Yahoo, MSN,... and that techniques breaks the rules and regulations of Search Engines. Black Hat SEO techniques might give you the higher ranking but for the short time period because you can not go to the long period term with Black Hat SEO Techniques by creating Doorway pages and Cloaking. So what is  Cloaking and Doorway Pages you can see the below post. Since now major search engines have been smarter than experts so if they detect any type of  technique which you used in your blogs or websites for higher ranking in search engines by Black Hat SEO then your blog or your website will be banned from search engines and Google will penalize you. So avoid the Black Hat SEO Techniques if you want to stay in search engines for a long time period. So How to Avoid Black Hat SEO Techniques follow the below points.

How To Avoid Black Hat SEO Techniques | Avoid Doorway Pages, Cloaking SEO

  • Hide or Invisible Text:

    This can be done by making your text color with same as  background color so no body can see it but these words will be there but be aware because search engines send traffic to your blog and you are cheating with your visitors so search engines would not leave you because their spiders can detect your technique and you get Banned. Some of the persons make font size very small and put keywords there which can not be read easily. So never do that if you want to make a relationship between your blogs and Search Engines.
  • Keyword Stuffing:

    This can be done by creating long list of keywords in a short space of blogs or websites and these type of keywords can be related to your post or can not be a part of your entire post even your blog. It is known as Keyword Stuffing. So avoid this black hat seo technique because if search engines find keyword density more than 10% in your blogs then you could be banned for sure.
  • Link to Spam Sites:

    In a general way a person could be known as a good person if they have a good friend circle and if they have a bad friend circle, known as a bad person while he was good. Search engines also follow this rule for your blogs or websites. So spam sites which have bad reputation and have been penalize in search engine and if you link to them then search engines treat that you are their friend and search engined could your ranking lower and could be labeled your blog as spam. So never link to spam sites or blogs.
  • Duplicate Content:

    Some of the newbies blogger come to the blogging world and think that blogging is so easy "but if you write your whole blog and update it regularly by typing word by word from your keyboard then definitely you face the problem that oh my god that is the time for my sleeping but yet I could not write my full article ok save it and I will complete it after morning. But this article will carry forward to day to day... " because they only do the copy paste job for there blogs and then search engines doesn't work for traffic for their blog then they search for Black Hat SEO Techniques and then they getting ban and blogging career ends. Please my newbies blogger my friends never ever copy any other works into your blogs because if you do that then search engines never give you any priority because they know the first article published date, time.. and treat you as a content theft and you getting ban. If you need any other content you like most then you can copy some amount of word from there and paste it to your blog and for more detail give a link back to the original source. That is the best way for making a relationship if you want stay in long term in blogging.

"I know some of Blogger Tutorial blogs who did copy paste my entire word by word posts in their blogs but still I am in the first page of google for my specific keywords and the blogs who theft my content never look on first pages. so If your content grabbed by some one then you can report to major search engines they will check and ban your theft. and if your theft's blog are hosted on Blogger then you can send your mail to blogger team they will delete your theft's blog. I am not planning to send the request of my grabbed content blogs because I know they are newbies and once day they will understand when they will serious about blogging"

  • Title Stacking:

    Never use more than one title for your any post or page. Some person use more than one title for any pages to getting higher ranking in the major search engines. Never ever do that because search engines smarter than persons and if they detect, you will get ban. You can see your title by going to your source code and see your title will be between <title>.....</title> tag.
  • Doorway Pages:

    What is Doorway Pages? Doorway pages are simple HTML pages which customized for specific keywords or phrases and fully optimized for search engines spiders. In short what is Doorway Pages. Suppose you want to go to purchase a SONY television and you went to market and see a board "We have SONY, TOSHIBA, PANASONIC Products" in any shop. then you feel oh I got it and suddenly you entered in that shop but there was no option for Televisions. Then you feel bad and similarly Doorway Pages are optimized only for Search Engines Spiders but not for the users when users search for specific keywords and go to that websites but there was no information for that queries  because it has been redirected to other website and user return back but search engines can detect it. If detect you used Doorway page. You will get banned if you do this Black Hat SEO Technique.
  • Don't distribute Viruses, Malwares, Spywares and Torjans:

    This is a perfect technique to getting ban in Search Engines if you distribute viruses, malwares, spywares and torjans. So if you distribute any type of software manually check it for viruses other wise your site will non index from the search engines.
  • Never Add Non-Related Keywords:

    Some persons add keywords to meta keywords which are not related to their site or blog. They think that they can drive traffic to their blog for that high generated traffic keywords which have no relation with their blog but never do that it could be very negative effect on your blog's relation with search engines.
  • Re-Write Content:

    There are so many software which works on any published article and swing it  or  make some changes here and there and says that given 90% unique article but this way is wrong and keep in your mind that search engines is smarter than you. If they checkout your technique you get ban.
  • Cloaking:

    What is Cloaking? Showing some content to Search Engines and while showing the some other content to your visitors is called as cloaking. To fool the Search Engines called Cloaking. It is not easy to fool Search Engines just you need to some programming knowledge. People comes to your site for some information and you cheat them then obviously Search Engines will never ever leave you if you use cloaking. If they detects they will ban you.

You done!

To Get Facebook Email Address/Facebook Email ID as yourname@facebook.com How to get facebook email id as yourname@facebook.com

1. Just log in to your facebook account.
2. If you have already created  your username in facebook, then skip this step and if not then do the following,
click on Create username in facebook then you will see some options like,


how to get facebook email address

Simply according to the preview choose your username(Make sure no space and no special character are in your username) and then Check Availability of your username and then save it.

Now your home profile page will be simply www.facebook.com/yourusername.

*** Once you created your user name. You can not be able to change it in the future so keep in mind to creating your username in facebook profile.

3. click on Facebook Email ID Request

then you will see a button "Request an Invitation", as in the following preview;


facebook email address

Click on "Request an Invitation", then you will see that button will show you "You will receive and invite soon". that's it. If you are lucky then you will get yourusername@facebook.com email address id soon.

***Q. Can I get messages from any traditional email system (e.g., Gmail, Yahoo and Hotmail) to my facebook email id? Where will I get these messages?

Ans. Yes, all the traditional email system can send you messages to your facebook email id and these messages will be delivered to your facebook messages.


Q. Can I send messages from my facebook email id to any traditional email system? will I use features in  my facebook email id such as attachment files as other traditional email system have? is there any other benefits to use facebook email id?

Ans. Yes of course, as if you receive any message to your facebook message then what does you get? sender profile picture with name and sender message. Now if you send message to external email addresses then the attractive feature is that it will remains look like the facebook messages, means it will delivered with your name and facebook profile picture with the message.
       Also you can use outlook web app for manage your facebook emails.

You done!

On Page Optimization In SEO for Blogs/Blogger/Beginners

  1. Research Keywords :

    Keyword research is the first step to starting the long term blogging career and also to start the On page Optimization because if you don't know about your niche keywords then you never generate traffic to your blogs as your niche should be deserve without researching your keywords and also If you are in the planning to monetize your blogs with some advertising companies such as Google Adsense then you must be research high targeted keywords for generate decent amount. The idea is simple because if you don't know the keywords that people searches mostly related to your niche then how search engine let you bring to the top position if you don't have any optimized page for that corresponding keyword.
    There are many software to researching the keywords of which mostly used by users such as Word Tracker which is a firefox plugin and you can use it in the browser while you are writing your post just enter your keywords then it will give you the suggestion of your related keywords which are mostly searches by the users.
    Mostly I am using google own keyword Tool just type your keyword phrases or keyword and search you will get lot of suggestion you can sort it by globally searches or locally search and noted down your keywords to any safe area.
  2. Domain Name :

    If you want to be stay in blogging for long term then I would suggest you that purchase your own domain name because if you used any free domain such as yourblogname.blogspot.com and after some months you want to be purchase your own domain name then you know how hard to increase your audience and by changing the domain name then you have to start working from the starting. I highly recommended that include your main keywords in your domain name because search engines gives priority to sites who have keyword also in domain name. If possible then register your domain name for a long term. The longer the registration the most trusted by search engines because many spam sites have short registration and longer the registration will indicate to search engines that you are building your site for long period.
  3. Blog Title & Post Title :

    Blog title is main factor for on page seo optimization. You can find it by going to your source code your blog title will be between <title> Your Blog Title </title>. So for creating your home page blog title make sure to include your main keywords in your blog title and don't make it longer or your blog title should be upto 70 words including spaces and not more than 70 words if you do that then your blog title will going to be overloaded and your blog title looks very spoil in search engine pages and your CTR will automatically decreases. You can take a snap shot of overloading in Fig. 1.1 into my previous post Swap Title in Blogger . This is also applied for post titles and also here not include more than 70 words in post title. Try to include your main keywords in the beginning of your titles because search engines gives priority from left to right. Don't use same title for different pages.
    If you blog is hosted on google blogger platform then by default your post tile not be search engine optimized because you will see your post title as "BLOG TITLE : POST TITLE" so you can see your blog home page title will be on the left side and your main page on which you created content for your targeted keywords is in right side and search engine will gives priority to your blog title not on post title so bring your post title on left side and remove your blog title on post pages because of 70 words criteria so that you can include your some keywords on post title too. so fixing this bugs read Change Post Title for SEO.
  4. Meta Tags :

    In On page seo optimization some webmasters says that search engines has been changed the algorithm and they did not use meta tags for search queries and it is also true if you don't have any meta description of your blog then google will generate automatically a description and shows it in the search result page. Basically how google find the description automatically the idea is simple if user search the query and then google finds a piece of 160 words from your posts which contains mostly the queries related term. So my question is that why you want to give extra work to google for finding the description the idea is simple create a good description which contains your keywords and if your selected description has best 160 words from your entire post.then google will show it. You can see meta tags as description and keywords as in your source code if you have,
    <META NAME="description" content="Your Description Here">
    <META NAME="Keywords" content="Your Keywords Here">
    meta keywords is not important for seo in these days because many users can stuffed with keywords so it is now not considered by major search engines and if you do that then no negative effect so add it properly because doing something is better than nothing.
    Make sure your meta tags must be unique for every pages of your blog. Never use the same meta tags for your pages it could be negative effect in seo for your blog. If your blog is hosted on blogger then read this post Add different meta tags for post, static, archive, home pages of blogger
  5. Page Headings H1, H2, H3.. H6 :

    Headings have major roles in on page seo optimization. you can see your headings in your source code it look like <h1> .. </h1>. Like a book if you read a book then first look at the name of the book as blog title have and then go to inside the book and you would like to see some headings before reading the book. This is also true for search engines. search engines look at your headings and H1 heading tag is more powerful in SEO than H2 heading tag and and similarly, H1 < H2 < H3 < H4 < H5 < H6
    Since H1 heading tag is most powerful among all heading tags so it doesn't means that you used H1 heading tags many times in the same post. Never do that if you do this then it could be negative effect in SEO for your blog. Only use one and unique H1 heading tag for your every pages of your blogs and then you can use H2 heading tags more than 1 which are subheadings and similarly for H3. I am mostly use upto H3 heading tags. You can suppose H1 heading tag is like your country and H2 heading tag like your state of your country and H3 heading tag like your cities in your state of your country and similarly you can expand it.
  6. Page Content :

    There is no doubt that content is the king for search engine optimization but your content must be have your targeted keywords as you find in your keyword tool see step 1. Try to use those keywords in the content and optimize your content page for some specific phrases means one or two but not enough phrases because if you do that then search engine will confused that for which phrases we have to bring this page into search pages. So in simple way use your suggested keywords by keywords tool in to your post page it will increase the chances for finding the traffic and optimized it with primary keyword which is the most searched keyword in your keyword tool and include your primary keyword in to the first paragraph of your post but never stuffed. And the second largest searched term you can use it by secondary keywords and use it in your content but be sure the quantity of your secondary keyword should not be more than primary keyword.
  7. Keyword Density :

    First thing you must be know that you are writing about your audience and not for search engines. So write your content normally and never stuffed your article by filling a lot keywords in your content. Basically your keyword density should be between 1% - 4% if your keyword density be 6% or 8% then your could be banned by major search engines. Keyword density means suppose you write 100 words and use 'SEO' 2 times, then your keyword density will be 2%. You can check for keyword phrases also. Use this tool for Keyword Density Checker.
  8. Internal Linking :

    Internal links means put your existing post URL into the post which is related to the existing one and for create a link use Anchor Text with your keywords related to post of which you want to add link because in the content area the linking is most trusted by the search engines. Being links in sidebar or in footer it is also in benefit but in the content area it is more powerful in SEO for on page optimization.
  9. URL Structure :

    Also search engines look at the URL of the post for keywords if they find keywords in the URL they could give some priority. So try to use your keywords in your URL structure which will be after your your domain name. For example could you see "On, page, optimization, SEO" in my URL structure in your browser URL field.
  10. Updating Content :

    The more you update your content the more traffic you get and the more indexing by search engines and the more probability to popular so try to write articles in your blogs at least one in a day. if not then at least two article in a week. Update content in your blogs is doesn't mean that go to your edit post and cut some part and add some part and publish it. It means you want to fool search engines but search engines not like a fool at least the current season.
  11. Related Niche Brands :

    It is a fact that if you want to read mathematics and you know two persons in which one knows mathematics, physics, chemistry, Bio, Social Science, Programming Languages, .. and much more. but on the other hand the other person only knows Mathematics so I have a question to you that with what person you want to read the first who knows mostly all things or the second one who knows the thing which you want. I would not say what you think but in my case I will prefer the second person who knows only mathematics because no one in the world exist who experts in all the field. Similarly Search engines mostly likes the blogs which related to a particular niche and all the post of the blog are related to that niche. For example I could not add any category in this blog related to 'health' because my niche is Tips & Tricks and based on SEO Technology.
  12. Image Optimization :

    I would not say about image optimization here because I have already created a post related to image search engine optimization with brief explanation. You can read it via SEO Optimization for Images
  13. Useful Gadgets :

    In your sidebars put recent post gadget (for linking each other pages) and don't forget to add gadget which contains the categories of your content. if you are a blogger account then it is know as Blog Archive widget. I highly recommended you to add related post gadgets below every post pages but above the comment box. You can use Linkwithin for related post gadget with thumbnails.
  14. Outbound Links :

    Basically outbound links are links which are points to other sites from your site. Keep in mind that for your every page your outbound links should not be more than 100. If possible then keep the links which are related to your niche, which will be beneficial for both your visitors and for search engines. But why for search engines? It would leave my visitors to linked site. Is outbound links help for indexing? I really have not much idea about that but think if you are writing an article and you know the article which is already published and mostly related to your own and if you link your article to that already published post so your visitors can read more information about your article for linking by you than not outbound link. Readers sure Love You (as a friend lol!) and back if they want other info. You can read more about Do Outbound Links matter in SEO.

Above are the factors what I measure through our SEO for my blog for On page optimization if you follow these steps then I am sure your pages will be optimized but game is not over because you have been done your batting and now you have to do bowling and in this case you have to some player for your fielding and you can play with more than 11 players( Ok don't take pressure on your knee. lol!). now you have to do Off page SEO Optimization for getting the benefits for you On Page SEO Optimization, or vice versa. click the following link.
  • Off Page Optimization for SEO ( Soon! just after 20 hour)

No Wait... Whenever Latest posts here delivered in your email just subscribe Blogger & SEO Technology

You done!

Submit your site to Alexa

On previous blog post, I wrote about submit website to popular search engines ( Google, Yahoo, MSN ...)..
But how about Alexa?
Alexa said : "There are a few reasons that Alexa may not have visited your site. Perhaps your site is new or we haven't discovered any links on the web that lead to your site. Or perhaps we haven't had any Alexa users visit your site. It is also possible that your web site administrator has disallowed crawlers from visiting your site - please read the information about robots.txt that we have provided above."

The easy way to submit your site to alexa is you or someone browse your site with a browser had Alexa toolbar intergrated.
If by any reason, your site not available at Alexa, don't worry. Just visit this link, go to the bottom, fill your website's address and click "Crawl my site". That's all.

http://www.alexa.com/site/help/webmasters

Happy harvest exp ;).

Customzie the blogspot title widget

Blog title is the place should contains most value description about your blog. With the blogspot title widget, did you try to push as many as possible keywords to the title? Keyword in title is quite important to make your higher ranking in search engines, the problem is if you put there many words, your bad title displayed, one example is: you wish to include a keyword and some relevant keywords into blog title but you only wish to display one main keyword. Do it as follow:

0. Remember to back up your template. :)
1. Login to your blog admin page, Go to Design as usual and open the 'Page Elements' view, change your blog title with many words you like as normal, Save it.
2. Now change to tab 'HTML View' and check the 'Expand Widget Templates' check box. Search the following text to find out your title widget code: b:widget id='Header1'. And then replace the script '<b:include name='title' />' with your actual title text you want to display on your blog.


3. Now View the blog, you see that the browser title will display different with your blog title, and you will see that the search engine index your real title ( not your displayed title ), that's nice :)

Create Pages in Blogger


his feature lets you easily publish static information on stand-alone pages. For example, you can create an About This Blog page that discusses the evolution of your blog, or a Contact Me page that provides directions, a phone number, and a map to your location.

You create a page similar to how you write a blog post. From Blogger click the Posting | Edit Pages tab, then click New Page. (Note: you can create up to 10 pages.)


Once your page is published, you can link to it from the new Pages widget. The Pages widget lets you add links to your pages as tabs at the top of your blog, or as links in your blog's sidebar.


In the Pages widget, you can decide which pages will be linked and in what order they will appear. You can also choose whether you want new pages to appear automatically in the Pages widget by checking or unchecking the box to the left of Add new Pages by default.

Finally, for those of you that have custom templates, your custom template may not automatically support Pages as horizontal "tabs". If you are familiar with HTML, follow these instructions on how to add Pages to your custom template.

Looking forward to seeing all of the Pages that bloggers create!

How To Fix PNG Transparency Problem in Internet Explorer 6


If you are using Internet Explorer version 6, you can see png images of web pages showing inside a white background. It add a bad appearance to your website or blog.This is a problem because still some people are using Internet Explorer version 6,it is the default browser for windows XP.So this quick and simple tutorial will show you how to fix this PNG transparency problem in Internet Explorer 6.

Login to your Blogger dashboard --> Design --> Edit HTML.

You don't need to click on "Expand Widget Templates".

Scroll down to where you see the </head> tag of your template.

Now copy below code and paste it just before the </head> tag.

<!--[if lt IE 7]>
<script type="text/javascript" src="http://bnote.googlecode.com/files/unitpngfix.js"></script>
<![endif]-->
I have hosted "unitpngfix.js" file on google code.

Note : Best thing is, hosting this "unitpngfix.js" file yourself.So you can download it from HERE.

Now save your template and you are done.You can check updates and more details of this script from http://labs.unitinteractive.com/unitpngfix.php.

How To Add Energy Saving Mode For Blogs or Websites

This is a free service and it is provided by http://www.onlineleaf.com/.Their standby engine is deliver a fully functional and simple way to help your website run requiring less energy to generate. It hides heavy animations, covers the window in dark colors (as these, in many cases are less energy consuming) and pauses heavily running background processes.

When your visitors are inactive, this engine launch a standby screen, with the text "Energy saving mode".

Energy Saving Mode For Blogs or Websites

This is very easy to add to your website or blog with in few seconds.

Login to your Blogger dashboard --> Design --> Edit HTML.

You don't need to click on "Expand Widget Templates".

Scroll down to where you see the </head> tag of your template.

Now copy below code and paste it just before the </head> tag.

<script language='javascript' src='http://www.onlineleaf.com/savetheenvironment.js' type='text/javascript'/>


This standby engine uses the jQuery Javascript library, so if you are using other Javascript libraries or code, add below code instead of above code :

<script language='javascript' src='http://www.onlineleaf.com/savetheenvironment.js' type='text/javascript'/>

<script>jQuery.noConflict();</script>

Time of inactivity

Also you can easily define how long time your visitors have to be inactive, for the engine to launch the standby screen, by adding ?time=X where X should be replaced with the number of seconds you would like to define the time interval. An example could be:

<script language="javascript" type="text/javascript" src="http://www.onlineleaf.com/savetheenvironment.js?time=120"></script>

... which will set the time of inactivity to 2 minutes (120 seconds).

This can be configured to display in any of the supported languages, if you add ?lang=code, where code is one of the language short codes below.

Supported languages
ak - Akan da - Danish de - German en - English es - Spanish fr - French fi - Filipino gr - Greekhr - Croatian id - Indonesian jp - Japanese it - Italian nl - Dutch pl - Polish pt - Portuguese bpt - Brazilian Portuguesero - Romanian sl - Slovenian se - Swedish sk - Slovak sw - Swahili tr - Turkish vi - Vietnamese
The following example will be using Spanish for the standby screen:

<script language="javascript" type="text/javascript" src="http://www.onlineleaf.com/savetheenvironment.js?lang=es"></script>

Most Wanted 15 jQuery Cheat Sheets for Web Developers

jQuery is the most popular java script library is used in today.it greatly simplifies java script programming.Here I listed most popular and very useful jQuery cheat sheet collection on the Internet,for anyone who like to learn jQuery.You can get more cheat sheets mentioned here as pdf files or image(.png,.jpeg) files.

jQuery is a fast and concise JavaScript Library that simplifies HTML document traversing, event handling, animating, and Ajax interactions for rapid web development. jQuery is designed to change the way that you write JavaScript.

From http://jquery.com/


1. jQuery 1.4.2 Visual Cheat Sheet

jQuery Visual Cheat Sheet, the refined and updated version of the popular woork's jQuery Cheat Sheet. The new edition includes all the reference you will ever need for jQuery 1.4.2 API!

jQuery 1.4.2 Visual Cheat Sheet

Article : http://woorkup.com/2010/06/13/jquery-1-4-2-visual-cheat-sheet/

Download : http://woorkup.com/wp-content/uploads/2010/06/jQuery-Visual-Cheat-Sheet-1.4.2.pdf


2. jQuery 1.4 Cheat Sheet

This cheet sheet attempts to better align with the new documentation structure jQuery is now using and clearly marks all new and updated functions for jQuery 1.4.

jQuery 1.4 Cheat Sheet

Article : http://labs.impulsestudios.ca/jquery-cheat-sheet

Download : http://labs.impulsestudios.ca/downloads/impulse_studios-jquery_cheat_sheet-1.0.pdf


3. jQuery Selectors

jQuery selectors are one of the most important aspects of the jQuery library. These selectors use familiar CSS syntax to allow page authors to quickly and easily identify any set of page elements to operate upon with the jQuery library methods. Understanding jQuery selectors is the key to using the jQuery library most effectively. This reference card puts the power of jQuery selectors at your very fingertips.

You must register(it is free) to get this cheat sheet.

jQuery Selectors

Article : http://refcardz.dzone.com/refcardz/jquery-selectors


4. jQuery 1.4.4 API Cheat Sheet

jQuery 1.4.4 API Cheat Sheet

Article : http://www.futurecolors.ru/jquery/

Download :
http://www.futurecolors.ru/jquery/jquery.cheatsheet.1.4.pdf
http://www.futurecolors.ru/jquery/jquery.cheatsheet.1.4.png


5. jQuery 1.3 cheat sheet wallpaper

jQuery 1.3 cheat sheet wallpaper

Article : http://www.gmtaz.com/jquery-13-cheatsheet-wallpaper/


6. jQuery Cheat Sheet - jQuery 1.3.2

jQuery Cheat Sheet - jQuery 1.3.2

Article : http://www.javascripttoolbox.com/jquery/cheatsheet/


7. jQuery Cheat Sheet - jQuery 1.1.3

jQuery Cheat Sheet - jQuery 1.1.3

Article : http://www.javascripttoolbox.com/jquery/cheatsheet/


8. jQuery - YUI3 Rosetta Stone

jQuery - YUI3 Rosetta Stone

Article : http://carlos.bueno.org/jq-yui.html#start


9. jQuery 1.3 Cheatsheet

jQuery 1.3 Cheatsheet

Article : http://blog.acodingfool.com/cheatsheets/jquery-1-3-cheatsheet/


10. jQuery 1.3 Visual Cheat Sheet

jQuery 1.3 Visual Cheat Sheet

Article : http://woork.blogspot.com/2009/09/jquery-visual-cheat-sheet.html

Download : http://www.scribd.com/doc/20161482/jQuery-Visual-Cheat-Sheet-by-WOORK


11. jQuery cheatsheet wallpaper

jQuery cheatsheet wallpaper

Article : http://chris4403.blogspot.com/2008/01/jquery-cheatsheet-wallpaper.html

Download :
http://cheatsheet.googlecode.com/svn/trunk/cheatsheet/src/jquery/jquery1.2-cheatsheet-1280-001.png
http://cheatsheet.googlecode.com/svn/trunk/cheatsheet/src/jquery/jquery1.2-cheatsheet-1280-002.png


12. jQuery 1.2 Cheat Sheet (colorcharge.com)

jQuery 1.2 Cheat Sheet (colorcharge.com)

Article : http://colorcharge.com/jquery/


13. jTouch – jQuery Cheat Sheet for iPhone

jTouch – jQuery Cheat Sheet for iPhone

Article : http://jtouch.colorcharge.com/


14. jQuery 1.2 Cheat Sheet

jQuery 1.2 Cheat Sheet

Article : http://www.gscottolson.com/weblog/2008/01/11/jquery-cheat-sheet/

Download : http://www.gscottolson.com/jquery/jQuery1.2.cheatsheet.v1.0.pdf


15. jQuery Selectors by codylindley.com

jQuery Selectors by codylindley.com

How To Embed Yahoo Media Player to Blogger

Yahoo Media Player is one of the easiest way to play audio files from your website or blog.It is very easy to embed into your site and only display when you click on the audio file name.Yahoo Media Player is not spend long time to load and someone can play all audio files of your website/blog using Play-list.

These are the main features of Yahoo Media Player:

  • Adds audio to your site with one line of HTML
  • Uses simple, easy-to-hack HTML instead of complicated proprietary markup, ushering in the REAL Media Web
  • Magical floating design never gets lost, is available when you need it, gets out of your way when you don't need it
  • Automatically finds all audio links on your page, turning your page into a playlist
  • Plays all your blog entries with a single button click
  • Allows you to put the play buttons where they belong: IN CONTEXT
  • Keeps the user in the page rather than sending them away to a media player
  • Picks up your images and adds them as cover art
  • Requires no download, install or maintenance

Yahoo Media Players

Follow these simple steps to embed Yahoo Media Player to your blog or website.

1.Login to your blogger dashboard--> Design - -> Edit HTML.

2.Scroll down to where you see </head> tag .

3.Copy below code and paste it just before the </head> tag .

<script type="text/javascript" src="http://mediaplayer.yahoo.com/js"></script>


4.Now save your template.

5.Go to Layout --> Page Elements.

6.Click on 'Add a Gadget'.

7.Select 'HTML/Javascript' and add the code given below (You can also add this code into Edit Html section of your Post Editor.):

<a href="DIRECT_URL_OF_YOUR_MP3-FILE">Name_Of_the_Mp3_File</a>

Note:

Replace "DIRECT_URL_OF_YOUR_MP3-FILE" with your .mp3 file direct url.
Replace "Name_Of_the_Mp3_File" with any name you like.

Look at the example given below:

<a href="http://mediaplayer.yahoo.com/example1.mp3">First link</a>

Paypal Rules Changed [Bad news for indians]

Although this news is few days old,I think it will helpful to people who don't know still about this.If you have a Indian Paypal account and have been using it to receive money from advertisers,clients,.. this will be a really bad news for you.

With effect from 1 March 2011, you are required to comply with the requirements set out in the notification of the Reserve Bank of India governing the processing and settlement of export-related receipts facilitated by online payment gateways (“RBI Guidelines”).

In order to comply with the RBI Guidelines, our user agreement in India will be amended for the following services as follows:

  1. Any balance in and all future payments into your PayPal account may not be used to buy goods or services.
  2. Any balance in and all future payments into your PayPal account must be transferred to your bank account in India within 7 days from the receipt of confirmation from the buyer in respect of the goods or services.
  3. Export-related payments for goods and services into your PayPal account may not exceed US$500 per transaction.

Frequently Asked Questions:

Q: Why will PayPal not allow me to receive more than US$500?

Starting 1 March, 2011, PayPal customers in India will not be allowed to receive payments for any export-related goods or services for an amount exceeding US$500 per transaction. This change is to ensure that we continue to comply with the RBI Guidelines.


Q: Why will PayPal not allow me to keep money in my PayPal balance?

Starting 1 March, 2011, PayPal customers in India will not be able to keep money in their PayPal account balance. Instead, all money received into a PayPal account must be transferred to a customer's India bank account within 7 days from the receipt of confirmation from the buyer in respect of the good or services. This change is to ensure that we continue to comply with the RBI Guidelines.


Q: Will my customers be able to complete their checkout with their PayPal account balance?

We're glad that you offer PayPal to your customers. Unfortunately, we will not allow customers in India to send money from their PayPal account balance starting 1 March, 2011. This means that your customers will need to link a credit card to their account in before sending you money with PayPal. This change is to ensure that we continue to comply with the RBI Guidelines.


Q: The customers on my website are not able to complete purchase or pay via PayPal. Why?

Starting 1 March, 2011, PayPal customers in India will not be allowed to receive payments for any export-related goods or services for an amount exceeding US$500 per transaction. If you are listing products greater than US$500 per transaction then you may need to seek alternative methods of payment. This change is to ensure that we continue to comply with the RBI Guidelines.


Q: What is meant by receipt of confirmation from the buyer in respect of goods and services?

As an exporter of products or services abroad, you need to ensure that your buyer has received the product or services as per specifications set out on your website. As an exporter of goods, you may withdraw the balance to your bank account in India upon reasonable consideration of shipping time and other clearances such as excise and customs for the destination country. As an exporter of services, you may withdraw the balance to your bank account in India upon receipt of payment from your buyer into your PayPal account.

How To Add Energy Saving Mode For Blogs or Websites

This is a free service and it is provided by http://www.onlineleaf.com/.Their standby engine is deliver a fully functional and simple way to help your website run requiring less energy to generate. It hides heavy animations, covers the window in dark colors (as these, in many cases are less energy consuming) and pauses heavily running background processes.

When your visitors are inactive, this engine launch a standby screen, with the text "Energy saving mode".

Energy Saving Mode For Blogs or Websites

This is very easy to add to your website or blog with in few seconds.

Login to your Blogger dashboard --> Design --> Edit HTML.

You don't need to click on "Expand Widget Templates".

Scroll down to where you see the </head> tag of your template.

Now copy below code and paste it just before the </head> tag.

<script language='javascript' src='http://www.onlineleaf.com/savetheenvironment.js' type='text/javascript'/>


This standby engine uses the jQuery Javascript library, so if you are using other Javascript libraries or code, add below code instead of above code :

<script language='javascript' src='http://www.onlineleaf.com/savetheenvironment.js' type='text/javascript'/>

<script>jQuery.noConflict();</script>

Time of inactivity

Also you can easily define how long time your visitors have to be inactive, for the engine to launch the standby screen, by adding ?time=X where X should be replaced with the number of seconds you would like to define the time interval. An example could be:

<script language="javascript" type="text/javascript" src="http://www.onlineleaf.com/savetheenvironment.js?time=120"></script>

... which will set the time of inactivity to 2 minutes (120 seconds).

This can be configured to display in any of the supported languages, if you add ?lang=code, where code is one of the language short codes below.

Supported languages
ak - Akan da - Danish de - German en - English es - Spanish fr - French fi - Filipino gr - Greekhr - Croatian id - Indonesian jp - Japanese it - Italian nl - Dutch pl - Polish pt - Portuguese bpt - Brazilian Portuguesero - Romanian sl - Slovenian se - Swedish sk - Slovak sw - Swahili tr - Turkish vi - Vietnamese
The following example will be using Spanish for the standby screen:

<script language="javascript" type="text/javascript" src="http://www.onlineleaf.com/savetheenvironment.js?lang=es"></script>

How To Add "Linkedin" Share Button with Counter to Blogger

LinkedIn operates the world’s largest professional network on the Internet with more than 90 million members in over 200 countries and territories. Linkedin has introduced Linkedin share button for websites,blogs to enable their readers and visitors to share the articles of that websites easily on Linkedin. LinkedIn is a place where busy and on-the-go professionals rely on their network to stay informed and make decisions.There were nearly two billion people searches on LinkedIn in 2010.

You can add a Linkedin share button to your website and enable visitors to share your content with their network.

In this tutorial I am going to explain how to add a Linkedin share button to your blogger blog.

There are 3 types of Linkedin share buttons : Vertical count, Horizontal count and No count.

Linkedin share button types

If you like to add these Linkedin share button to your blogger blog,then follow the steps given below.

1.Login to your blogger Dashboard--> Design- -> Edit HTML

2.Click on "Expand Widget Templates"

3.Scroll down to where you see below code:

<div class='post-header-line-1'/>

4.Now Copy your "Linkedin share button" code and paste it just below the above code.

NOTE: If you can't find <div class='post-header-line-1'/> in your template, paste your "Linkedin share button" code just before <data:post.body/> .

Code 1 : Vertical Count
<b:if cond='data:blog.pageType == &quot;item&quot;'>
<div style='float:right;margin-left:10px;'>
<script src='http://platform.linkedin.com/in.js' type='text/javascript'/><script data-counter='top' expr:data-url='data:post.url' type='in/share'/>
</div>
</b:if>

Result:


Code 2 : Horizontal Count
<b:if cond='data:blog.pageType == &quot;item&quot;'>
<div style='float:right;margin-left:10px;'>
<script src='http://platform.linkedin.com/in.js' type='text/javascript'/><script data-counter='right' expr:data-url='data:post.url' type='in/share'/>
</div>
</b:if>

Result:


Code 3 : No Count
<b:if cond='data:blog.pageType == &quot;item&quot;'>
<div style='float:right;margin-left:10px;'>
<script src='http://platform.linkedin.com/in.js' type='text/javascript'/><script expr:data-url='data:post.url' type='in/share'/>
</div>
</b:if>

Result:


5.Now save your template.

Refresh your site. Now you can see Linkedin share buttons in every post pages.

How To Add IntenseDebate Comment System to Blogger

IntenseDebate is one of the most popular a feature-rich comment system for WordPress, Blogger, Tumblr and many other blogging/CMS platforms.In this tutorial I am going to explain how to add IntenseDebate comment system to Blogger blog.

With IntenseDebate,you can do many things than your default comment system.These are some main features of IntenseDebate comments.

IntenseDebate features:
  • Comment Threading.
  • Reply-By-Email.
  • Email Notifications.
  • Commenter Profiles.
  • Moderation/Blacklisting.
  • Reputation Points & Comment Voting.
  • Plugins API.
  • OpenID.
  • Widgets.
  • Twitter Connect.
  • Facebook Connect.
  • RSS Readers & Tracking.


HTML Formatting

You can also customize your links and add some photos to your comments. IntenseDebate supports the following HTML tags: <a>, <b>, <i>, <u>, <em>, <p>, <blockquote>, <br>, <strong>, <strike>, <img>

Gravatar

Intensedebate offers full Gravatar support. If you have a Gravatar they will automatically upload your Gravatar when you signup for IntenseDebate. You can choose to use your Gravatar or upload a different profile pic.

Before start this process,you must backup your blogger template first.Save the backup template file on your hard drive.


1.Create a Account on IntenseDebate.com.


2.Now add your blog to IntenseDebate : http://intensedebate.com/install


3.Then you can see this window. Now you have to select some option.


1.How would you like to install IntenseDebate?

select "Template" option.


2.Which blog posts should have IntenseDebate comments enabled?

Only on new posts
- Your old comments will be displayed using your blog's native comment system

On all blog posts
- IntenseDebate comments will be available on all posts, but your existing comments will be hidden.

Select "On all blog posts" option.

Note : If you want to keep "Blogger default comments of your old blog posts",then select "Only on new posts".

4.Scroll down to the bottom of the instructions.

Now upload the template you have backup.


5.After uploading it you can see a screen like below. Copy modified template code from the textfield.


6.Login to your blogger dashboard--> Design--> Edit html.

7.Select entire code in the Edit Template text Box and delete it.Now you must have a blank text box.


8.Now paste the code we have copied in step 5.

Save your template.You are done.


You can see IntenseDebate comment form under your blog posts.

How To Add Disqus Comment System to Blogger

DISQUS is a comments platform that helps you build an active community from your website's audience. It has awesome features, powerful tools, and it's easy to install.Before this I have explain how to add IntenseDebate comment system to blogger blog and now I am going to explain how to add Disqus comment system to your blogger blog.

There are lot of good features with Disqus comment system when we comparing it with Blogger default comment system.

Realtime comment system

Comments become more like live discussions with realtime posting and updating. By offering a faster, more intuitive experience, Disqus is everyone's favorite way to comment.

Notification and reply system

The notification system lets people know when they've received a response. Best of all, they can continue the conversation straight from the email.

Inline media embedding

Full integration with media services such as Youtube, Flickr, and more. Attach media such as photos and videos right within the comments.

Mobile commenting

Fully compatible with mobile websites for commenting while on the go. The default mobile theme is formatted with smartphones, like the iPhone or Android phones, in mind.

Social integration

Full integration with Facebook, Twitter, and more. Let people login, comment, and share using social services they already use and love.

The Community Box

A quick way to show off what your community is made up of. The community box gives everyone a summary view of the activity and people participating on the site.

Liking and sharing

People can rate what they like by liking pages or comments and then sharing that on Facebook, Twitter, and other networks.

Moderation tools

Powerful and easy-to-use tools helps you keep your community under control. The moderation panel is designed for managing a large volume of incoming comments.

Spam-Be-Gone

Our in-house anti-spam technology keeps spam and unsavory people out of your community. Our anti-spam continually learns from the rest of the Disqus network to keep your site safe.

Mobile apps

Disqus apps are available for the iPhone, Android, and webOS phones. Manage your communities while you're on the go with these freely available apps.

Blacklists and whitelists

Make daily moderation easier with granular control over who gets to contribute within the community. Disqus gives you powerful tools such as blacklists, whitelists, and word filtering.

Import and export

Import existing comments into Disqus and sync up your data. All data is completely portable and can be exported at any time.

International languages

Disqus supports dozens of languages in addition to English. Complete your integration with native language support.

SEO-friendly and local sync

We offer plugins and integration methods that ensure compatibility with search engines.

Theme customization

Customize with CSS to smooth out the integration with your website. Or, use our advanced theme editor to craft your own custom theme.

Tweets and reactions

Disqus brings the conversation back to your site by collecting Tweets, mentions, and other reactions from around the web.

Profile management

Commenters control their personas and reputation across the different communities they participate on. Disqus makes it easy to track and keep conversations together.

Activity streams

Audiences stay engaged with insight into others' activity all over the web. Integrated activity streams let people see where else the smart people are talking.

Connected communities

Disqus reaches 200 million people every month across half a million websites and communities on the web. Keep the conversations lively by connecting your audience with the millions of others already on Disqus.

Before follow the instruction given below,

(a) Login to your Blogger Account.
(b) Backup your blogger template.
(c) Make sure that your blog is using Blogger Layouts. See upgrade instructions if not.
(d) Enable commenting. See instructions to enable commenting. Make sure that Who Can Comment? is set to Anyone.

Now Follow the steps given below. You can add Disqus comment system to your blog easily.

1. First create a account on Disqus.com.

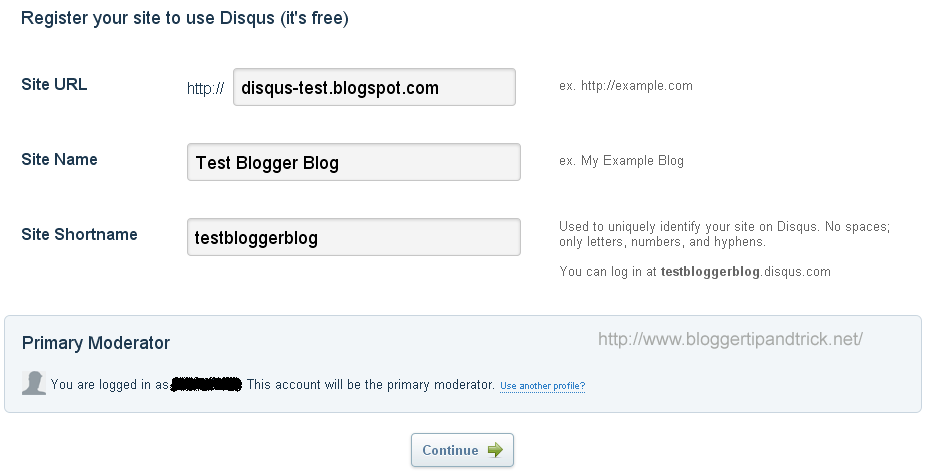
2. Now visit this link to add your blog to the Disqus account:

http://disqus.com/admin/register/

3. Fill in the necessary details and click on "Continue".

Register your blog

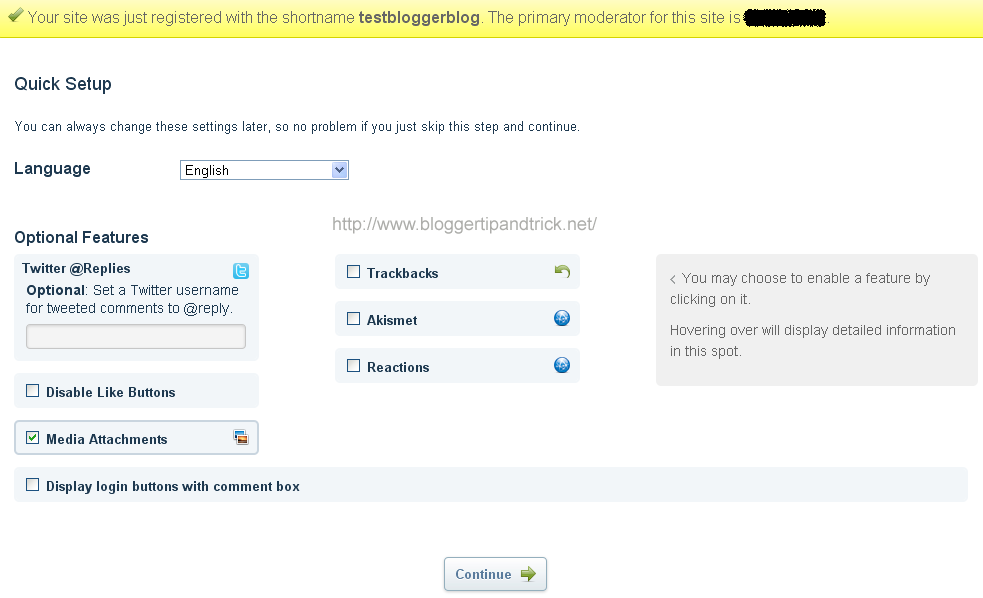
4. Now you can see below screen. select the option as you like and click on "Continue" again.

Select options

5. Now can see installer instructions page.
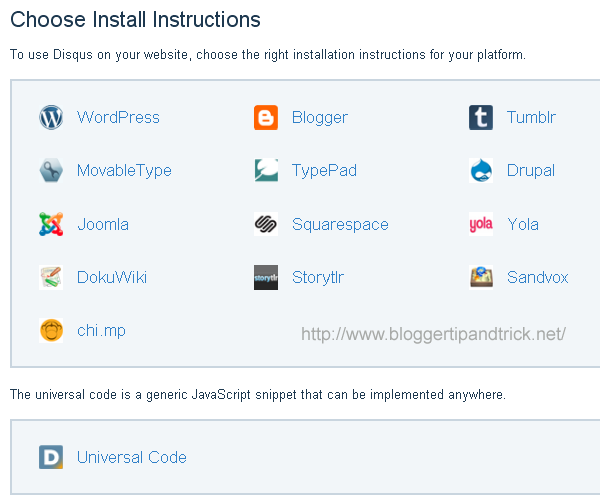
Select Install Instruction

Click on "Blogger" instructions.
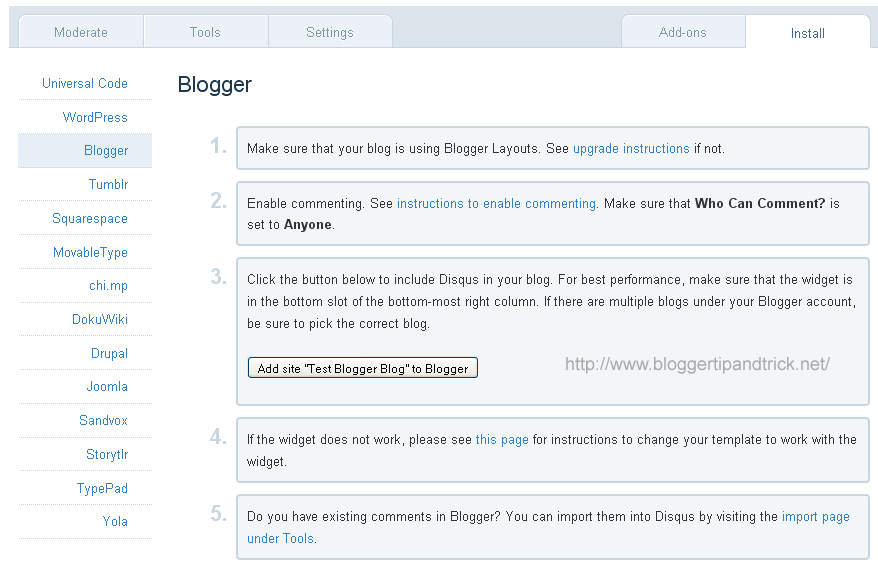
Install Instruction

6. Now click on "Add site..." button.

Add your blog to Disqus

7. You will bring to your blogger account. If there are multiple blogs under your Blogger account, be sure to pick the correct blog. Select your blog and click on "Add Widget" button.

Add Page Element


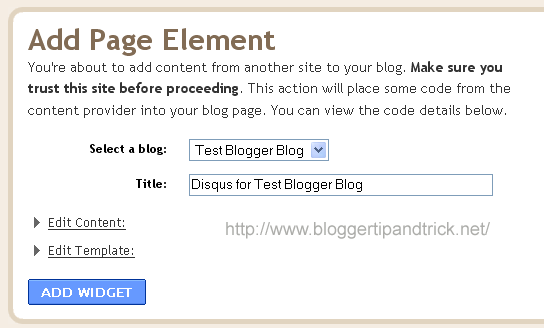
You are done. you can see Disqus widget there in Blogger "page elements" page. For best performance, make sure that the widget is in the bottom slot of the bottom-most right column.

Now Disqus comment box will appear under your every blogger posts.